This is heavily work in progress (tutorial seriously started, May, 27 2014)
If interested in the map format itself, take a look at this page
Motivation[ | ]
Creating a map in RWR isn't really difficult but it takes some time as a common 3D editor doesn't exist and most likely never will. Everything will all be done inside Inkscape in a 2D-view. If you are used to Inkscape then it should be even easier for you. Just keep in mind that a map won't be finished in a couple of hours so you might think about it twice before you start working on a map.
What's needed:[ | ]
- For your own maps or editing DLC maps: Inkscape, version 0.92 or newer at https://inkscape.org/release/inkscape-0.92/ (older versions work as well but there might be some compatibility issues)
- For editing vanilla maps: Inkscape version 0.91 at https://inkscape.org/release/inkscape-0.91/ (editing/copying vanilla maps in higher versions may bug the map out)
- RWR Inkscape extension: it's shipped with the game in installation_folder\tools\inkscape. After you installed Inkscape, put those 2 files (rwr.inx and rwr.py) in the Inkscape\share\extensions folder
- A tutorial map template: RWR tutorial map template. Extract the content (the "tutorial map" folder) of the archive into [Running with Rifles]\media\packages\vanilla\maps. In the library layer inside the objects.svg file you have a lot of useful informations too.
- convert.exe and composite.exe: 2 required files from Imagemagick, which is a command line image editor/composer. Put those 2 files in the folder of your actual map you are working on, i.e. "tutorial map". You can find those files HERE
Inkscape introduction:[ | ]
Inkscape is a vector graphic tool which is used as Map editor in Running with Rifles. The extension of Inkscape files is ".svg". Most informations of a map are inside the file "objects.svg" located in each map directory. After installing Inkscape, just double click the objects.svg in your "tutorial map" directory.
IMPORTANT: the rendering library in Inkscape is not the fastest unfortunately, so avoid to zoom in too much unless you have the filters deactivated. You can toggle the filter visualization in edit mode by pressing ctrl+keypad5. For most parts of the mapmaking you won't need filters to be shown constantly, so if you experience some dropdowns in performance, just disable them. You can also improve performance by toggling the 'materials' layer when you don't need to refer to its templates.
Important shortcut keys:[ | ]
F1 Select Use to move them around. Pressing the object in select mode twice allows you to rotate the selected object(s) by dragging the arrows at the corners of the selection. IMPORTANT: NEVER use the arrows of the selection to resize an object. This breaks the transformation matrix and causes the object to appear at a different location on the map than intended. Use the edit path tool instead (see below). | |
F2 Edit paths Use to move nodes (wall/fence... elements or grass/sand... terrain splat) around or to resize an object.
| |
F3 Zoom Once you press it you have different zoom options shown on the top at the top of the Inkscape window. Ctrl+Mousewheel is usually preferred to zoom in/out.
| |
F4 Draw Rectangles With the exception of wall and fence elements (which are paths), every logical object (buildings, trees, rocks, vehicles, etc.) is made out of rectangles. If some of them appear to be circles on some existing maps, it's because the corners of the rectangles have been rounded up (see top of the Inkscape window when having the rectangle tool selected)
| |
Shift+F6 Draw Bezier curves. Use to make wall elements or to draw a splat map (grass/sand/road, etc). Once you have drawn your wall elements, you can adjust the nodes with the edit path tool F2 if required.
IMPORTANT: if you use it to make a wall element, keep in mind that all stroke between the nodes must be straight and not curved or the game will convert the curve into a multitude of very tight wall elements. To remedy,
you can select all the nodes with the edit path tool | |
Shift+Ctrl+L Show Layers. You can create layers and sublayers there, making some layers (in)visible, locking them, etc.
| |
Ctrl+G Group selected objects. Required to group two paths together forming a platform/deck/cliff/tower, etc.
| |
Shift+Ctrl+G Ungroup selected objects. Required to ungroup two wall objects forming a platform/deck/cliff/tower, etc.
IMPORTANT: If you imported a group from another map to your own map or rotated a group, you need to ungroup it and regroup it to keep the transformation matrix behaving correctly. | |
Shift+Ctrl+F Edit objects. With this tool you can set the fill/stroke colour of an object and its opacity and also add gradients. The colour of the objects is irrelevant for RWR, it's mainly a visual thing to keep track of the different object types in the editor.
| |
F7 Colour picker. With this tool you can set the fill colour of your selected object to take the colour of where you click with this tool activated. While keeping Shift pressed it will take the colour for the stroke of the object you selected.
| |
Shift+Ctrl+O Object Properties. With this tool you can edit the ID, label, and description of objects. Useful for changing what an object actually is in-game.
|
Very important tips[ | ]
Ctrl+keypad5toggles the filters visualisation (makes the rendering a LOT faster)Middle Mouse Buttonkeeping it pressed pans the mapCtrl+LMBon an object inside an object group (towers, bridges, decks, etc. are made like this) will only select the single object you chose. This is important when you want to see the properties of either the start path or ending path of such a group. If you simply click on the group it will only show the group properties, which is pretty much no information at all- Choosing a copy of a template object (in the materials layer) needs to be put in a layer, layer1, layer2, etc (and their sub-layers) to be loaded. The "materials" layer can't contain any physical objects, just parameters, templates, texture atlases, etc. This is often a source of confusion when an object is missing on the map. An easy way around this issue is to first copy the object you want from the materials layer, then select an item in the map that is on the same layer as you want the object (from materials) to be placed in. This will select the layer and when you paste the item, it will be pasted into the correct layer.
Map editing aspects:[ | ]
RWR uses texture splatting for combining different terrain textures. Each layer has an opacity map which defines extent of texture presence on the terrain. The method works by applying an opacity map to the higher levels, revealing the layers underneath where the opacity map is partially or completely transparent.
Dirt Layer
The base terrain texture is the "dirt" layer and needs to be present for each map as fully opaque texture over the whole map size (it can be bigger as only the part inside the page boundaries will be taken). The color doesn't mind, we use brown to make it visible as a dirt layer.
alpha_sand, alpha_grass, alpha_asphalt, alpha_road, (alpha_rocky_mountain) Layers
Those are the alpha layers which will be mapped on top of the dirt layer. alpha_road is the highest layer, then asphalt, then grass, then sand. Of course also other alpha_layers could be used instead or some be left out (in the map rattlesnake crescent the alpha_sand has been left out and a alpha_rocky_mountain has been added). It is important though to have a MAXIMUM of 4 alpha splat layers + the dirt layer. There are also 4 layers for surface effects which are by default utilized by the dirt, blood, skidmarks and snow.
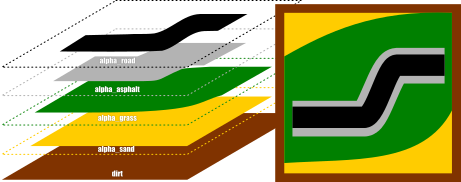 texture splatting example |
Just draw content on each layer in Inkscape in the according layer. Colors in these layers don't matter, what matters is where the content is and where it's not.
Drawing a shape in Inkscape is usually done with the bezier tool (Shift+F6). To close the shape, just connect the starting and ending point. Afterwards just fill the shape with a color (using Shift+ctrl+F: edit Fill and Stroke)
Terrain Heightmap Layer
Like in most games, the terrain heigthmap is a grayscaled image
In Inkscape, the heightmap needs to be in the "height" layer, it's usual to use only shades of grey, each of which will be mapped to a certain height level in game. Completely black color i.e. 0 corresponds to 0 meter level, white i.e. 255 is 25 meters. The water level is at about 2m, i.e. shade of 20.

Not to do
- closing your objects.svg while being zoomed in. If you have layers containing filters unhidden (usually grass, sand, height) it will load extremely slowly so that it feels like inkscape is hanging. Remember to zoom out when closing the document and to have those layers mentioned above hidden.
- modifying the size of an object with F1 (selecting the object, then adjust the size while dragging the arrows shown on the edge and corners of the object). You should ONLY change the size with F2 and dragging the corners to match the size you want.
Game objects[ | ]
Rectangles[ | ]
| Name (only here for user reference) | ID/Label/Title Requirement | Layer Requirement* | Description Parameters |
|---|---|---|---|
| Bases | base should be present in one of
ID, label, or title fields. |
bases layer (REQUIRED)
|
name=<base name>; faction_index=<faction_no.>;
|
| Static Soldier Spawn Point | spawn should be present in one of ID,
label,or title fields. |
spawnpoints sub-layer
of layer1/layer2 |
|
| Static Vehicle Spawn Point | None, but make sure to put
|
type = vehicle;
| |
| Crates | crate should be present in one of ID,
label, or title fields. |
||
| Generic Nodes | generic_node<unique-number-sequence>should make up ID field.
|
See below** | tag=<custom_tag_name>;
|
*Note that objects can be placed in any sublayer if in Layer1, 2, or 3, the sublayers are purely for better management. If you want stationary objects to be on ground level, put them in Layer1. If you want them to be on top of buildings or other objects, put them in Layer2.
Bases
- Requires the string
baseto be present in one of the ID, label, or title fields - Object must be added to the layer
bases - Description field can store data such as:
name=<base name>; faction_index=<faction_no.>; capturable=(1|0);
Static soldier spawn point
- Requires the string
spawnto be present in one of the ID, label, or title fields - Object must be added to a sub-layer of layer1 or layer2 named
spawnpoints
Static vehicle spawn point
- Description:
type = vehicle; key = <vehicle_key>;
Crates
- Requires the string
crateto be present in one of the ID, label, or title fields
Generic Nodes
Objects can be programmatically created in the level via Generic Node rectangles in Inkscape and the getGenericNodes(...) method in RWR Scripts.
- ID:
generic_node<unique-number-sequence> - Description:
tag=<custom_tag_name>;- Layer: as defined in the map_config.xml e.g.
<include_layer name ="layer1.hostageLocations" />
- Layer: as defined in the map_config.xml e.g.
In this instance, 'layer1.hostageLocations' is a separate layer in the objects.svg file and the <custom_tag_name> is given to an item in a sub-layer of this layer.
Procedurally generated objects[ | ]
Buildings
- Building texture patterns
- See this thread post http://www.runningwithrifles.com/phpBB3/viewtopic.php?f=7&t=1319&p=8114#p8114
Trees
Visuals
Collision models
Mesh sets
Multiple Mesh Templates defined as a set. Used to randomise the displayed object/item on a map
- ID:
mesh_set1 - Description:
template = <mesh_set_template_Description_name>;
- ID:
mesh_set_template1 - Description:
name = fir;
mesh_template = fir1;
mesh_template = fir2;
mesh_template = fir3;
Mesh Templates
Referenced individually or via mesh sets
- ID:
rect8111-<unique-number-sequence> - Label:
#mesh_template - Description:
name = fir1;
mesh_name = fir1.mesh;
texture0 = world_atlas1.png;
texture0_atlas_cell = 3 1 16 16;
collision_model_type = 0;
collision_model_size = 1.0 6 1.0;
alpha_blend = 1;
visual_hitbox_size = 3.5 10 3.5;
#visual_hitbox_offset = 0 0 0;
Mesh
- ID:
rect8111-<unique-number-sequence> - Label:
#mesh - Description:
template = fir1;
The Description can reference a mesh template or be fully declared, as is done in the mesh_template description
Decal Templates
- ID:
decal_template<unique-number-sequence> - Label:
#rect10748 - Description:
name = <template_name>;
texture0 = decal_decoration_atlas.png;
texture0_atlas_cell = 4 7 8 8;
Decals
- ID:
decal5-4-5-6-3-3 - Label:
#rect10748 - Description:
template = <template_name>;
Paths[ | ]
Walls / fences
- Layer: any
- ID:
wall<unique-number-sequence> - Description:
template = InvisibleWallPlayer;
Platforms
- Description:
One path/side: type = start;
Other path/side:
type = end;
wall_template = BrickWall1;
top_material = terrain;
mode = bridge;
Road network
Avoidance regions
AI units will avoid walking into the areas defined by these paths.
- ID:
avoid1-<numbers-and-dashes> - Label:
#path7528
Map view appearance[ | ]
- For base names, create a text object
F8 - Layer:
map_view_bases
General settings[ | ]
- Create a rectangle object in the materials layer and set its Object Properties --> Label to
#general. - In the Object Properties --> Description area, text such as the the following can be used
day_color = fill; # the colour the rectangle is filled with, or use HTML colour code format #RRGGBB
night_color = stroke; # the colour of the outside edge (stroke) on the rectangle
name = <Map Name>;
description = <Free Text Description>;
randomize_faction_index=0;
flip = (0|1); # use 1 unless you want to swap the bases factions spawn at
visible_in_menu = (0|1);
show_base_names_in_map_view = 0; #
Exporting heightmap, terrain layers[ | ]
The RWR Inkscape extension is used for exporting the heightmap, terrain splat maps, and map view (map overlay). The extension ships with the game in <installation_folder>\tools\inkscape.
The exporter picks up splat maps based on Inkscape layers named as alpha_*. Map view gets currently picked up for exporting from layers named as map_view_decoration on the root level layer, and woods*, objects*, walls* and rocks* inside each layer.
- Post processing exported resources AKA generating the in-game mini-map map.png
Mac / Linux: Download rwr-map-tools, which contains the shell script equivalents of the batch files created for windows without the sadness and with support for ImageMagick versions 6 and 7, plus includes some short-o-mations (see the README.md)...
PC
You may need to adjust the file names referenced in process.bat to match the terrain splat maps.
process.bat :
- applies a slight blur over the splat maps (without having to have blurring enabled in Inkscape at all times); and
- converts the heightmap to Greyscale ( required by RWR).
process_post.bat :
- combines the splat map layers (maximum 4, see information on splat maps, above) into one image. Doing so allows terrain rendering to be done in one pass instead of many.
- The game always attempts to locate
terrain5_combined_alpha.pngfirst; if it's not found, the old rendering method is used. Also, if you have more than 5 layers (base layer + 4 terrain layers), the old rendering method is used.
process_map_view.bat :
- creates
map.pngfrom the map view related exported stuff and a bunch of helper images. This output file is what you see when you pressTABin game.
Advanced stuff:
- terrain.cfg
- partial live reload
Testing your map in Running with Rifles[ | ]
Assuming that you have exported your textures from the objects.svg files within Inkscape and applied process.bat, process_post.bat and process_mapview.bat, then you should be ready to check your results in game.
You should run the game in debugmode and without AI (you wont need them to test at first).
To do so, launch the game with the following command line options:
PC:
<RWR_install_folder>\rwr_game.exe no_ai debugmode verbose map=media\packages\vanilla\maps\<map_name>
Mac:
- Navigate to the RWR install folder:
cd /Users/<username>/Library/Application\ Support/Steam/SteamApps/common/RunningWithRifles/RunningWithRifles.app/Contents/MacOS
- Run the game executable, passing various command line options:
./RunningWithRifles debugmode verbose mod=media/packages/<mod_name> map=media/packages/<mod_name>/maps/<map_name>
In-game, in debugmode, you can use the following shortcut keys:
F2toggle shadows (view in conjunction withF9)F4free camera - withWASDyou can fly around.Shift+WASDmakes you fly around fasterF5show object collision meshesF6switch between day and night timeF7toggle HUD overlayF9different useful informations. Most of them are self-explanatoryCtrl+F9wireframe modeCtrl+F8refreshes the area around your soldier. Useful when you make a change in yourobjects.svgfile, like moving an object so that you don't have to restart the game every time. Notice that only the objects around you will be refreshed, the rest of the map objects will be gone