How to obtain a mod from Workshop?[ | ]
- Go to [1] or access RWR's Workshop in Steam client
- Browse the shop for mods you wish to try
- Access a mod page and click on Subscribe - Steam will begin downloading the mod content
- Once downloaded, the mod shows up in the game in either Start new Campaign menu or Start Quickmatch menu in Setup mods -- depends on the mod
- Generally mods are encouraged to be made as campaigns, look there first unless described otherwise
- Alternatively, if you attempt to join an online game using Workshop content, the game offers you to subscribe to the mod
- Accepting subscription, Steam begins the download and once done, the game will let you attempt joining the server again
How to upload a mod to Workshop?[ | ]
- A custom GUI client has been created for Windows users. See the Workshop upload tool post on the forum [2]
- For linux and mac users, the process is as follows:
- 1. Download the
steamcmdapplication for your operating system; - 2. Somewhere outside of your RWR install folder make a folder where you will be storing the workshop item. I called mine rwr_mods;
- 3. In that folder place the image that will appear for the workshop item (mine is 512x512px and < 1MB in size);
- 4. Create a <your_mod_name>.vdf file, which stores all the information about the mod. The following block gives an example:
"workshopitem"
{
    "appid"        "270150"
    "publishedfileid"    ""
    "contentfolder"      "/<full>/<path>/<to>/<folder_created_in_step_2>/<your_mod_name>/"
    "previewfile"        "/<full>/<path>/<to>/<folder_created_in_step_2>/<your_workshop_item_image>.<extension>"
    "visibility"         "0"
    "title"              "<the name of your mod e.g Big Bazookas vs Nasty Naders>"
    "description"        "<some text e.g. Stable build 1.0.0, Stardate 732.94>

<your full text description about your mod here>
"
    "changenote"        "<a version or date e.g. 1.0.0 Stardate 732.94>

- <stuff you did since the last release>
- <other stuff that you did since the last release>
"
}
appid is the app id for RWR. It is always 270150
publishedfileid will be returned after you first publish the mod on the workshop. You should populate this field in <your_mod_name.vdf> with that ID immediately, to allow you to add to your mod in subsequent runs of steamcmd
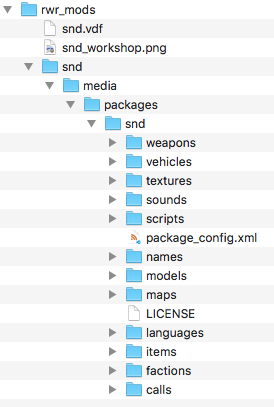
- 5. inside the folder created in step 1, create a folder that matches the name of your mod's folder name in rwr. For me, it's snd;
- 6. Inside that folder, create the folder structure media/packages/<your_mod_name>;
- 7. Copy your mod content into this folder. Your folder structure should now look something like the example image below this list;
- 8. Run the steamcmd utility, as follows:
steamcmd +login <your_steam_username> +workshop_build_item '/<full>/<path>/<to>/<folder_created_in_step_2>/<your_mod_name>.vdf' +quit
How to create a mod?[ | ]
Simple mod[ | ]
Just want to make a simple mod for testing weapons, models, sounds etc. without dealing with all that other stuff? Here's a quick guide:
- Find your RWR install folder
- Go to the media/packages folder.
- Create a new folder with your mods name.
- Inside that create a file called package_config.xml and paste this into it, edit as needed and save.
<?xml version="1.0" encoding="utf-8"?>
<package
    name="Your mods name here"
    description="Your mods description here"
    show_in_campaigns="0"
    show_in_quick_match_mods = "1">

</package>
- Now you are ready to add your modded files. Make sure you mirror the folder structure and naming of vanilla files and your modded files will be loaded instead.
- General mod types
- Campaign mod - appears in Start new Campaign menu (preferred)
- Quickmatch - appears in Quickmatch mod list
- usually used for testing content in various maps, or testing custom maps
- simply content for other mods
- models, sounds, weapons, vehicles, items, factions, maps, etc
- in most cases can't be played directly, needs a Campaign or Quickmatch mod to utilize the content
- only exception is maps; if the map allows it, the map will show up among the maps in Start Quickmatch menu
- Create a local folder for your mod
- Locate where RWR is stored on your system
- On Windows
C:\Program Files\Steam\SteamApps\common\RunningWithRifles - Linux:
~/.local/share/Steam/SteamApps/common/RunningWithRifles - Mac OSX:
~/Library/Application Support/Steam/SteamApps/common/RunningWithRifles/RunningWithRifles.app/Contents/Resources
- On Windows
- Create a new folder in the RWR folder, in subfolder media/packages, e.g. media/packages/my_mod
- Use underscores
_or hyphens-instead of spaces and use lowercase characters only in your file names; Linux and Max systems are case-sensitive i.e.My_Man.xmlandmy_man.xmlis the same file in Windows, but two separate files in Linux and Mac.
- Locate where RWR is stored on your system
- Create a new text file package_config.xml in the folder with such content as
<package name="my mod" description="my very own mod" />
- If it's a Campaign mod, you'll be using a script to define what happens when the Campaign is started - usually starting from a map change, starting the match, handling what happens when the match ends
- You'd add show_in_campaigns="1" and campaign_entry_script="start_campaign.as" in <package> in package_config.xml, so that it says
- If it's a Campaign mod, you'll be using a script to define what happens when the Campaign is started - usually starting from a map change, starting the match, handling what happens when the match ends
<package name="my mod" description="my very own mod" show_in_campaigns="1" campaign_entry_script="start_my_mod.as"/>
- You can control which UI controls are shown in Start Campaign menu for your Campaign with by adding attributes like faction, presets, friendly_capacity, enemy_capacity, friendly_accuracy, enemy_accuracy, xp_multiplier, rp_multiplier, with value of 0 (disable) or 1 (enable) in the package element; by default all are enabled
- If it's a Quickmatch mod, the mod is loaded as additional content after the map resources chosen in the Quickmatch menu
- You'd add show_in_quick_match_mods="1" in the package element to make the mod available there
- If it's just a content package meant to be used by other packages, you're done - in fact you wouldn't need the package_config.xml file at all
- Some templates exist targeted for Campaign mods, find them in media/packages
- simple_template: simple 1-map Campaign with looping and script side save/load enablers, see media/packages/simple_template/readme.txt for details
- full_campaign_template: Vanilla Campaign with enablers for replacing factions, item deliveries and unlock items
- Let's extend it into a simple Campaign mod!
- Copy all files from media/packages/simple_template/scripts to your own mod e.g. media/packages/my_mod/scripts
- Edit the files, start_campaign.as and my_gamemode.as and work out the marked TODO points
- Start RWR, choose Start new Campaign, your mod should show up in the list of available campaigns, select it and continue
- Start the Campaign - the sliders won't have an effect yet as your script is not prepared to handle the settings
- If the map loads, congrats, you've just made a new Campaign mod
- If nothing happens, there's a problem in the script
- Navigate to %appdata%\Running with rifles (~/.running_with_rifles/ on Linux), and open rwr_game.log
- On Windows, you might eventually want to use something like Notepad++ to work with the files, but the good old Notepad will work too
- Scroll to the end of the log to see what's the problem
- Most of the time it's about syntax errors in the script, read the error descriptions, fix them and retry
- It's a good idea to run RWR in a window (Configure in Steam to change fullscreen to No) when working with mods
- With Notepad++ you can keep rwr_game.log open and reload it when it changes (use the File menu)
- You can then switch between windows quickly and try starting your Campaign in RWR, look at errors in rwr_game.log in Notepad++ and fix the scripts
- Navigate to %appdata%\Running with rifles (~/.running_with_rifles/ on Linux), and open rwr_game.log
- What's next?
- a) Create new content into the mod; TODO: Content mod link
- b) Use scripts to create new logic into your mod; TODO: Script work link
- c) Extend the Campaign into a multimap scenario - look into full_campaign_template to use Vanilla Campaign as a basis or come up with a custom solution of your own
- d) look at other mods to learn how they did it
- e) look at what Vanilla did (media/packages/vanilla/scripts)
- Eventually you'll want to publish the mod, see SteamWUT; TODO link
- Watch out for weird stuff if you subscribe to your own mod and have it located under RWR's media/packages with the same name.
Quick Match Mod[ | ]
This section deals specifically with adding script support to quick match mods. If you simply want your mod to work in quick match mode, see the information surrounding the simple template files, above.
Enabling script support in Quick Match is possible, but requires some thought if your goal is to use the same scripts that work in campaign mode in a quick match. The reasoning behind this statement is that campaign mode extends the invasion game mode, and invasion mode expects the player will be taking part in a multi-level/map adventure. This is entirely different in Quick Match, where only a single map is concerned. There is no game state passed between start and end of each mission in quick match, so including script classes that make campaign mode work is not only pointless, but also adds overhead to your load times and is likely to create unexpected issues.
The following example describes one way to enable script support in Quick Match mode. You may find another or a better way to do this. If and when you do, please update this wiki page to share your knowledge with the modding community.
You must replace all occurrences of <my_mod> with the relevant text e.g. your mod's folder name in the below files...
- Include the following within your mod's
package_config.xmlpackage tag:
show_in_quick_match_mods="1"
quick_match_entry_script="start_quickie.as"
- hint: if you're using custom maps, include the
quick_match_entry_script="start_quickie.as"statement inside themap_configtag block in the map'smap_config.xmlfile as well!
- Create
scripts/start_quickie.asand populate it (content following//on each line is a comment and is not interpreted):
// paths containing angel script files
#include "path://media/packages/vanilla/scripts"
#include "path://media/packages/<my_mod>/scripts"

// <my_mod> quickmatch gamemode and script refs
#include "<my_mod>_quickie.as"

void main(dictionary@ inputData) {
	XmlElement inputSettings(inputData);

	UserSettings settings;
	settings.fromXmlElement(inputSettings);
	//_setupLog(inputSettings); // uncomment for go-live
	_setupLog("dev_verbose");  // while building and testing your mod, it's wise to have dev_verbose logging enabled
	_log("*** <my_mod>: start_quickie.as running...",1); // write to the log to confirm your quick match entry script is being run

	MyQuickie metagame(settings); // create an object 'metagame' of class 'MyQuickie'. The object 'settings' (of class UserSettings) is passed into the metagame object.

	metagame.init();   // the base methods are found in vanilla/scripts/internal/metagame.as, if you are interested
                          // declaring them in the 'MyQuickie' class allows you to extend and override the default behaviour
       // the following if/else block works around a bug that causes loading saved games in Windows to freeze at 100% loaded in Windows (thanks for the fix pasik :-))
       if (!_quitSignalReceived) {
           _log(" no quit signal, proceed", 1);
           metagame.run();
           metagame.uninit();
       } else {
           _log(" quit signal, skipped game", 1);
       }
	metagame.uninit(); //

	_log("ending execution"); // write to the log when our quickmatch session ends
}
- Create the MyQuickie class as a derived class of GameMode. Following on from other game modes, we'll create
<my_mod>/scripts/gamemodes/quickmatch/<my_mod>_quickie.asfor this purpose. We'll steal a little from other gamemode scripts to create a custom one. You should chop and change included files, methods, trackers, etc. as appropriate for your mod.:
// internal
#include "gamemode.as"
#include "user_settings.as"
#include "log.as"
#include "query_helpers.as"

// generic trackers
#include "basic_command_handler.as"
#include "autosaver.as"
#include "looper.as"

// <my_mod> custom scripts
#include "<my_mod>_tracker.as"

// --------------------------------------------
class MyQuickie : GameMode {
	protected UserSettings@ m_userSettings;
	string m_gameMapPath = "";

	// --------------------------------------------
	MyQuickie(UserSettings@ settings) {
		super(settings.m_startServerCommand);
		@m_userSettings = @settings;
		_log("*** <my_mod> : made it into MyQuickie constructor", 1);
	}

	// --------------------------------------------
	void init() {
		GameMode::init();

		if (m_userSettings.m_continue) {
			// loading a saved game?
			load();
			preBeginMatch();
			postBeginMatch();

		} else {
			// no, it's not a save game
			changeMap();
			sync();
			preBeginMatch();
			startMatch();
			postBeginMatch();
		}

		// add local player as admin for easy testing, hacks, etc
		if (!getAdminManager().isAdmin(getUserSettings().m_username)) {
			getAdminManager().addAdmin(getUserSettings().m_username);
		}
	}

	// --------------------------------------------
	void uninit() {
		save();
		GameMode::uninit();
	}

       // --------------------------------------------
	protected void changeMap() {
	}

	// --------------------------------------------
	protected void startMatch() {
	}

	// --------------------------------------------
	void postBeginMatch() {
		GameMode::postBeginMatch();

		updateGeneralInfo();
		save();

		addTracker(AutoSaver(this));
		addTracker(BasicCommandHandler(this));
		addTracker(Looper(this));

		// <my_mod> handlers:
		// addTracker(MyTracker(this));       // enable custom trackers for your mod here
	}

	// --------------------------------------------
	protected void updateGeneralInfo() {
		const XmlElement@ general = getGeneralInfo(this);
		if (general !is null) {
			m_gameMapPath = general.getStringAttribute("map");
		}
	}

	// --------------------------------------------
	const UserSettings@ getUserSettings() const {
		return m_userSettings;
	}

	// --------------------------------------------
	void save() {
		_log("saving metagame", 1);

		XmlElement commandRoot("command");
		commandRoot.setStringAttribute("class", "save_data");

		XmlElement root("saved_metagame");
		XmlElement@ settings = m_userSettings.toXmlElement("settings");
		root.appendChild(settings);

		commandRoot.appendChild(root);
		getComms().send(commandRoot);
	}

	// --------------------------------------------
	void load() {
		_log("loading metagame", 1);

		XmlElement@ query = XmlElement(
			makeQuery(this, array<dictionary> = {
				dictionary = { {"TagName", "data"}, {"class", "saved_data"} } }));
		const XmlElement@ doc = getComms().query(query);

		if (doc !is null) {
			const XmlElement@ root = doc.getFirstChild();
			const XmlElement@ settings = root.getFirstElementByTagName("settings");
			if (settings !is null) {
				m_userSettings.fromXmlElement(settings);
				// set continue false now, so that complete restart (::init)
				// will properly execute start rather than load
				m_userSettings.m_continue = false;
			}

			m_userSettings.print();

			_log("loaded", 1);
		} else {
			_log("load failed");
		}
	}

	// --------------------------------------------
	protected void sync() {
		XmlElement@ query = XmlElement(makeQuery(this, array<dictionary> = {}));
		const XmlElement@ doc = getComms().query(query);
		getComms().clearQueue();
		resetTimer();
	}

        // --------------------------------------------
	const XmlElement@ queryLocalPlayer() const {
		array<const XmlElement@> players = getGenericObjectList(this, "players", "player");
		const XmlElement@ player = null;
		for (uint i = 0; i < players.size(); ++i) {
			const XmlElement@ info = players[i];

			string name = info.getStringAttribute("name");

			_log("player: " + name + ", target player is " + m_userSettings.m_username);
			if (name == m_userSettings.m_username) {
				_log("ok");
				@player = @info;
				break;
			} else {
				_log("no match");
			}
		}
		return player;
	}
}
Full Campaign Mod[ | ]
- Create a folder named <mod_name> in
resources/media/packagesand copy the files in thepackages/full_campaign_templatefolder into your mod folder - Follow the TODOs in these .as files (open with a text editor or your preferred IDE)
- Copy files you want to mod from the
packages/vanillafolder structure into your mod's folder and start modding them!
File and folder structure and interconnectivity[ | ]
/
- The mod's root folder contains
package_config.xml, which references the mod's startup script file as well as UI components such as the mod's description, which can be passed as a text string here or as a string that matches a key name found in/languages/<language>/package_ui.xml. When the latter is used, the value of the key (another text string) is displayed.
Finally, the file specifies a number of campaign options as boolean settings, which dictate whether the player may customise the mod's default settings at launch.
/calls
- Radio calls
*.calland theall_calls.xmlare found here. Theinvasion_all_calls.xmlfile is also present, but simply includes the all_calls file. All calls lists the file names of the call files that are included in the game. These files contain the actual call key value, which is referenced in/factions/common.resourcesto make the call available to use. To make a call faction-specific, include it in/factions/<faction>_default.resources, not the common resources file.
/factions
all_factions.xmllists the factions in the mod. Make sure the order you list the factions here matches that inscripts/my_stage_configurator.as<faction>.xmlhigh-level information about each faction in the game/mod, from rank structure to unit / soldier type declarations. This file links to a bunch of resource files that are specific to the faction, and also common to all units in the game.<faction>_default.resourcescontains links to vehicles, weapons, radio calls, and carry items specific to the faction. Items are named and enabled here, but also have to be listed inall_(vehicles|weapons|calls|carry_items).xmlfiles in their relevant folders!<faction>_primaries.resourcescontains the primary weapons used by members of the faction (in addition to those listed incommon.resources)<faction>_secondaries.resourceslists the secondary weapons available to the faction (again, in addition to common weapons)<faction>_supply.resourcescontains the items that are available to the faction from supply dropscommon.resourceslists the resources available to all factions. Put an item in here instead of a faction's resources if all factions are able to use it
- - Important note: All carry items (vests, costumes, etc.) available in the game must be listed in
common.resources. This includes faction-specific carry items, which also requireenabled="0"to be set, making them present in the game but not available to anyone by default. These carry items must then be listed in<faction>_default.resourceswithenabled="1"to enable that carry item only for that faction
*.characterfiles each references another level of .character file, starting with (e.g.)default_male.charactervoice files, todefault.charactertext / chat comments, todefault_base.character, which sets several key parameters such as movement speed.default.aiand other.aifiles contain the real AI meat, and are referenced by soldier/unit types in<faction>.xmlfiles, which lets you make different types of AI for different unit types. AI files can also base parameters on an already existing AI file, so you don't have to create an entirely new file if you just want to change a few things, for example, many AI files in vanilla usedefault.aias the base and then change a few parameters<type>.squad_configfiles list unit types that will be present in a squad of that type. Referenced (as usual) byall_squad_configs.xml. The user can pre-configure these squad configs and then cycle through them in-game with home and end keys
/items
- Items (excluding weapons) that can be worn such as vests and items that can be dropped from and picked up into a character's inventory.
all_carry_items.xmlandall_visual_items.xmlare found in here and reference the physical file names for these items. Each of these files then notes the key value for these items. Finally,/factions/common.resourcesis used to include the carry items (by key reference) in the game. See the note above in factions regarding listing — but disabling — all faction-specific carry items in this file.
/languages
- The contents of the
package_ui.xmlfile in each sub-folder (by language code) is referenced by the/package_config.xmlfile. Primarily used to store key/value pairs for campaign descriptions, setup/config options, and to call the script/scripts/start_campaign.asthat forms the entry point of the mod. Also seeintro.xmlfor text info that displays on the loading screen.
/maps
- Add your custom maps in here. Each map
maps/<map_name>should have its ownmap_config.xmlandscene.xmlfile here to fully customise the look and feel of the map. - - Important note: A
scene.xmlfile anywhere else in your mod will override the settings you place in the file belonging to each map. - Change the default sounds and music for each map by adding
.wavfiles directly into the relevant map's folder. For example, to override the standard daytime ambience with a custom, looping audio file you have created, add the file as<mod_name>/maps/<map_name>/ambient_daytime.wav
/models
- All 3D models are found here either in
.xml(voxel) or.mesh(OGRE 3D) format. Note that while most vehicles are ogre meshes, the general consensus is that only voxel models can be animated via a skeleton (e.g. the soldier models). Seesoldier_animations.xmlto understand how the animations are managed.
/names
- Files containing lists of first names and last names, broken down by faction. Referenced by
<faction>.xml, and each name file can be used for multiple factions at once, or not at all.
/scripts
- Angel Script files that allow you to modify and extend the game's behaviour. Do note
scripts/internal/log.asallows you to control logging level to therwr_game.logfile. Handy for testing and debugging while building the mod.
/sounds
- Sound Effects in 44K mono WAVs please. Soundtrack / music in 44K stereo WAVs.
/textures
- Almost entirely
.pngfiles of artwork for hud items and texture wraps for ogre static models. Bit depth must be 32-bit, it won't break the game if it isn't, but the texture will have an ugly, black square background. To check bit depth, right-click-->Properties-->Details. You can change bit depth by re-saving textures using programs like paint.net
/vehicles
all_vehicles.xmlcontains a list of the file names for vehicles in the game. As with other resources, these resources' keys need to be included by the common or faction-specific.resourcesfiles.
/weapons
- This folder contains the usual
all_weapons.xmlfile along withall_throwables.xml. These two files list the file names of every*.weaponavailable in the game. Depending on each weapon's class, it will fire a*.projectileor apply an effect directly (melee/medikit/bandage). Weapon models are usually voxel-based if held by soldiers. To save doubling up on code — and unless you specifically want different weapons to be available in different game modes — you can reference theall_weapons.xmlfile frominvasion_all_weapons.xmlas follows:
<?xml version="1.0" encoding="utf-8"?>
<weapons>
    <weapon file="all_weapons.xml" />
</weapons>
How to create mod content?[ | ]
- General things about packages and overlay resource system
- Files are added in an in-game resource system
- Most resources are referred to by filename only, no path, also in all XML and Angelscript files
- In case there are several similarly named files in the system, only the one loaded last is used
- This makes it possible for a content mod to replace how an AK47 looks in otherwise a vanilla game
- e.g. resource meshes, textures, sounds, specifications can be changed this way without having to locally change vanilla files
- How to create voxel items? https://www.youtube.com/watch?v=5PxWf1xZ7cw
- How to create weapons?
- How to get various faction resources (like weapons) into the game?
- Faction files, e.g. media/packages/vanilla/factions/green.xml control which items are available for the faction
- In Vanilla, such faction resources are listed for each soldier group in *.resources files
- To add your new weapon mod for a faction, for example
- 1) Ensure the weapon is loaded by the game in the first place, you generally need to have it in all_weapons.xml (or invasion_all_weapons.xml if you're overlaying Vanilla Campaign)
- 2) Duplicate green_default.resources file into your mod to overlay the Vanilla version of the file
- 3) Edit the file and add your weapon key (usually you'd define the key in the weapon file to be same as the filename, but it's up to you) in the list similar to others
- 4) Ensure your weapon specification doesn't have in_stock="0" which makes the weapon unavailable in an armory
- 5) Done! Playing as Greenbelts with the mod enabled, the basic type soldiers would now have a chance to spawn carrying your weapon, and players can find it in the armory
- How to create factions?
- See media/packages/vanilla/factions, green.xml, grey.xml or brown.xml
- These files refer to the additional faction specific files *.models, *.resources, *.character, *.ai for convenience
- Adding another faction can be basically done by duplicating one of these in your mod with another name
- To get that faction playable in a Campaign, you'd likely want to pick full_campaign_template as a basis for your mod's scripts
- In my_stage_configurator.as you'd refer to your custom faction as one of the three available factions
- You could also extend the Vanilla Campaign to deal with 4+ factions scenario, by e.g. introducing your own version of media/packages/vanilla/scripts/gamemodes/invasion/stage_configurator_invasion.as, with 1-4 factions defined for each stage
- Note that all_factions.xml is used by the Start new Campaign menu for the list of available factions; only the name field is used
How to run a mod on a dedicated server?[ | ]
- Use SteamCMD to download RWR on the server, see [3]
- Use SteamCMD to download the mod
- TODO: instructions
- Figure out the Workshop item ID from the URL: TODO instructions
- Copy the mod SteamCMD downloaded to a location where the RWR server knows to look for it, media/packages/
- Create steam_workshop_items.txt in RWR server root folder and list the required Workshop item ID(s) there, one per line; clients use this info to ensure they have the correct resources
- Duplicate the mod's gamemode script and edit server settings in it
- It's possible the mod's author has created a server specific starter script, located in media/packages/the_mod_folder/scripts/start_mod_server.as, filename may vary
- If there's no such example script, you may have to create it yourself from mod's campaign start script
- It totally depends on the mod, but if it's based on Vanilla campaign or templates, chances are you'll need to add something like this in the script
        settings.m_startServerCommand = """
<command class='start_server'
        server_name='MyModServer'
        server_port='1240'
        comment='Yes yes very nice mod server come see'
        url=''
        register_in_serverlist='1'
        mode='COOP'
        persistency='forever'
        max_players='24'>
        <client_faction id='0' />
</command>
""";
- Launch the server
- Start your gamemode script in the console with start_script start_my_mod.as media/packages/the_mod_folder
- For additional stuff about server setup, see [4]
What to do with scripts?[ | ]
- Scripts and the Metagame interface
- XML commands described behind above link can be executed
- From a script by sending a command to the game
- With init_match.xml, usually in a map folder, to run a bunch of commands at the start of a match
- When a radio call is made, if the call supplies <command>s inside its <round>s
- As a <result class="xml_command"><command ... /></result> in events in grenade or vehicle specifications
- As a local player by typing /_execute file.xml with file.xml in RWR root folder, the file consisting of a <command /> or <commands><command>...</commands>
- From server console by typing execute file.xml, like above
- Angelscript reference docs ... cript.html
- Look at what vanilla does media/packages/vanilla/scripts/
- If there's a problem with a script, rwr_game.log will tell you about it (see below)
Troubleshooting errors with your mod[ | ]
Always 'tail' the rwr_game.log file in a terminal/powershell window when launching and playing your mod and have verbose debug log output enabled. The log provides invaluable insights to your mod's behaviour and performance.
- Linux:
tail -f ~/.running_with_rifles/rwr_game.log - Windows:
get-content "$env:APPDATA\running with rifles\rwr_game.log" -wait - Mac:
tail -f '/Users/<username>/Library/Application Support/RunningWithRifles/rwr_game.log'
rwr_game.log error messages[ | ]
loading factions in map config
path: <mod_folder_path>/maps/<map_name>/map_config.xml
loading map config <mod_folder_path>/maps/example/map_config.xml
loading map config, game=2091103744
loading faction in all_factions.xml
path: <mod_folder_path>/factions/all_factions.xml
loading faction in <mod_folder_path>/factions/all_factions.xml
CHECK: faction element not found
!!!EXECUTION HALTED!!!
Ensure all_factions.xml references files <faction file="my_faction.xml />", not keys <faction key="my_faction" />.
loading faction resources in <mod_folder_path>/factions/<file_name>
<some_text>
CHECK: characters or character element not found
execution halted
This error indicates you have made reference to a non-existent character file in factions/<faction>.xml.
Ensure the file exists in the factions folder, is spelled correctly, matches the case and launch the game again.
loading faction resources <mod_folder_path>/factions/common.resources
loading faction resources in <mod_folder_path>/factions/<another_file>.resources
loading faction resources in
CHECK: resources element not found
execution halted
This error indicates you have made reference to a non-existent resources file. The actual file causing the error (typo, doesn't exist, or trying to load a non-existent resource) will be the file loaded after <another_file>.resources is listed in factions/<faction>.xml.
loading calls in <mod_folder_path>/calls/<call_name>
loading calls in
CHECK: calls or call element not found
execution halted
Similar to the error above, this error indicates you have made reference to a non-existent call file in calls/all_calls.xml. Calls are generally processed in the order they are listed in all_calls.xml, so check which call was the last to load before the error occurred and the error will most likely be to do with the next referenced file. Also, make sure that the call in question is not currently opened by a text editing program (Notepad, Notepad++, WordPad, etc). It is generally good advice to close ALL files and text editors before loading up a game.
.../scripts/<folder>/.../<filename>.as (<line_num>, <col.>) : ERR  : No matching signatures to '<text>'
Please correct the errors in the script and try again.
- Does
<filename>.asinclude the file that contains the class, constructor, method, etc. referenced in text? - Are you trying to call a protected method from outside that class?
- Are you trying to call a method that simply doesn't exist? :-)
CHECK: unset loading failed, key=<some_file.ext>
!!!EXECUTION HALTED!!!
Validate your XML file. There is likely a syntax issue or a duplicate declaration inside a tag.
ERROR, invalid weapon at slot 0 for vehicle <a_vehicle>.vehicle
!!!EXECUTION HALTED!!!
Something related to the weapon declared in the first <turret ... /> block in the vehicles/<a_vehicle>.vehicle file is erroneous. Either the weapon file has not been loaded, the key is a duplicate, or the .weapon file is otherwise misconstructed.
Similarly, slot '1' refers to the second turret block, slot '2', the third, etc.
OGRE EXCEPTION(4:ItemIdentityException): An object of type 'RibbonTrail' with name 'RibbonTrail<trail key>' already exists. in SceneManager::createMovableObject at /Users/davidrogers/Documents/Ogre/ogre-v1-7/OgreMain/src/OgreSceneManager.cpp (line 6490)
Attempting to use custom projectile trails in mod (as .trail files). Issue is caused by the mod being loaded twice via scripts/start_campaign.as.
Comment out the following block to resolve:
array<string> overlays = {
                "media/packages/<mod_name>"
        };
        settings.m_overlayPaths = overlays;
- Note: this may result in some vanilla resources not being loaded. Check the
rwr_game.logfor new, non-fatal errors and warnings after making this change
WARNING, creating instance of class 5, invalid type -1
Ensure the vehicle you are trying to spawn is listed in vehicles/all_vehicles.xml
WARNING, creating instance of class 7, invalid type -1
Ensure the projectile you are trying to fire is listed in weapons/all_projectiles.xml
OGRE EXCEPTION(2:InvalidParametersException): Header chunk didn't match either endian: Corrupted stream? in Serializer::determineEndianness at /Users/davidrogers/Documents/Ogre/ogre-v1-7/OgreMain/src/OgreSerializer.cpp (line 89)
Appears to have occurred as a result of attempting to use an XML model on a vehicle instead of an OGRE mesh.
Issues that don't show up in rwr_game.log[ | ]
- Commander briefing at start of mission fails to appear
- - This generally indicates you have made a syntax error early on in
/languages/en/default_shared.character, such as a missing forward slash '/' at the end of a<comment key="blah" text="blah blah" />tag. Every line after the one(s) with a syntax issue will fail to be read at start time, resulting in the comment keys used in the commander briefing failing to appear. - - You may also notice unprivileged calls (xp < 1000) don't result in a text bubble advising "I don't have a radio yet" or other text string appropriate to the
<comment key="no radio equipment"... />. These comment tags start from line 110, so your syntax error is going to be before this line.
- Inkscape map items don't appear in game
- - Ensure no filters are applied on the object (rectangle). Bottom status bar will show Rectangle (filtered) in layer... when the item is selected. Use Filters --> Remove Filters to fix then save
objects.svgand reload game. - - Ensure the item/object has been placed in the appropriate layer.